Step-by-Step Guide to Using a Compact Kitchen Composter
Want to reduce food waste without having a large outdoor compost pile? A compact kitchen composter makes it easy to turn everyday scraps into nutrient-rich compost while keeping smells and mess to a minimum.
Whether you’re using an electric composter, a countertop compost bin, or a Bokashi system, this guide will walk you through everything you need to know.
Using a compact kitchen composter involves placing the unit in a convenient location, adding approved food scraps, following the manufacturer’s instructions, maintaining proper moisture levels, cleaning regularly and using the finished compost to enrich plants and gardens. Most modern composters are designed to be odor-free and easy for beginners to use.
Why Use a Compact Kitchen Composter?
Compact composters are ideal for:
- Apartments and small homes
- People without gardens
- Reducing food waste sent to landfill
- Creating nutrient-rich compost for indoor plants and gardens
- Living a more sustainable lifestyle
Many modern kitchen composters are designed to be odor-free, easy to maintain and beginner-friendly.
What Is a Compact Kitchen Composter?
A compact kitchen composter is a small system designed to process food scraps indoors. Depending on the type, it may use:
- Microbes (Bokashi composting)
- Natural decomposition
- Heat and grinding (electric composters)
Popular options include countertop bins, electric composters and Bokashi buckets.
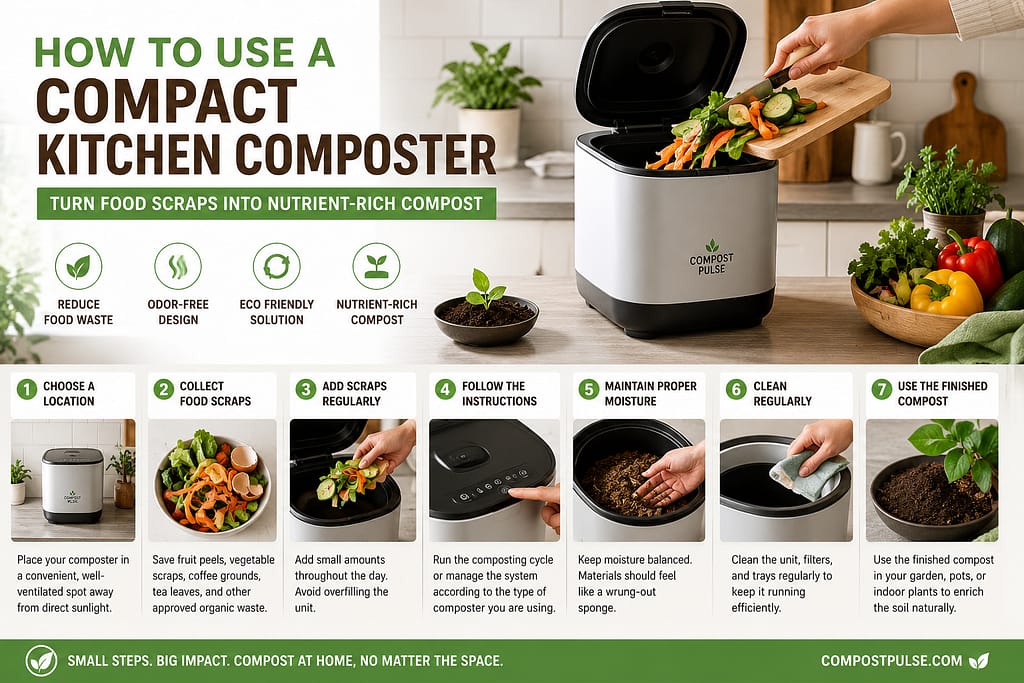
Step 1: Choose the Right Location
Place your composter in a convenient spot such as:
- Kitchen countertop
- Pantry
- Laundry room
- Utility area
Choose a location that:
- Is easily accessible
- Has good ventilation
- Is away from direct sunlight
- Has a nearby power outlet (for electric models)
Keeping the composter close by encourages consistent use.
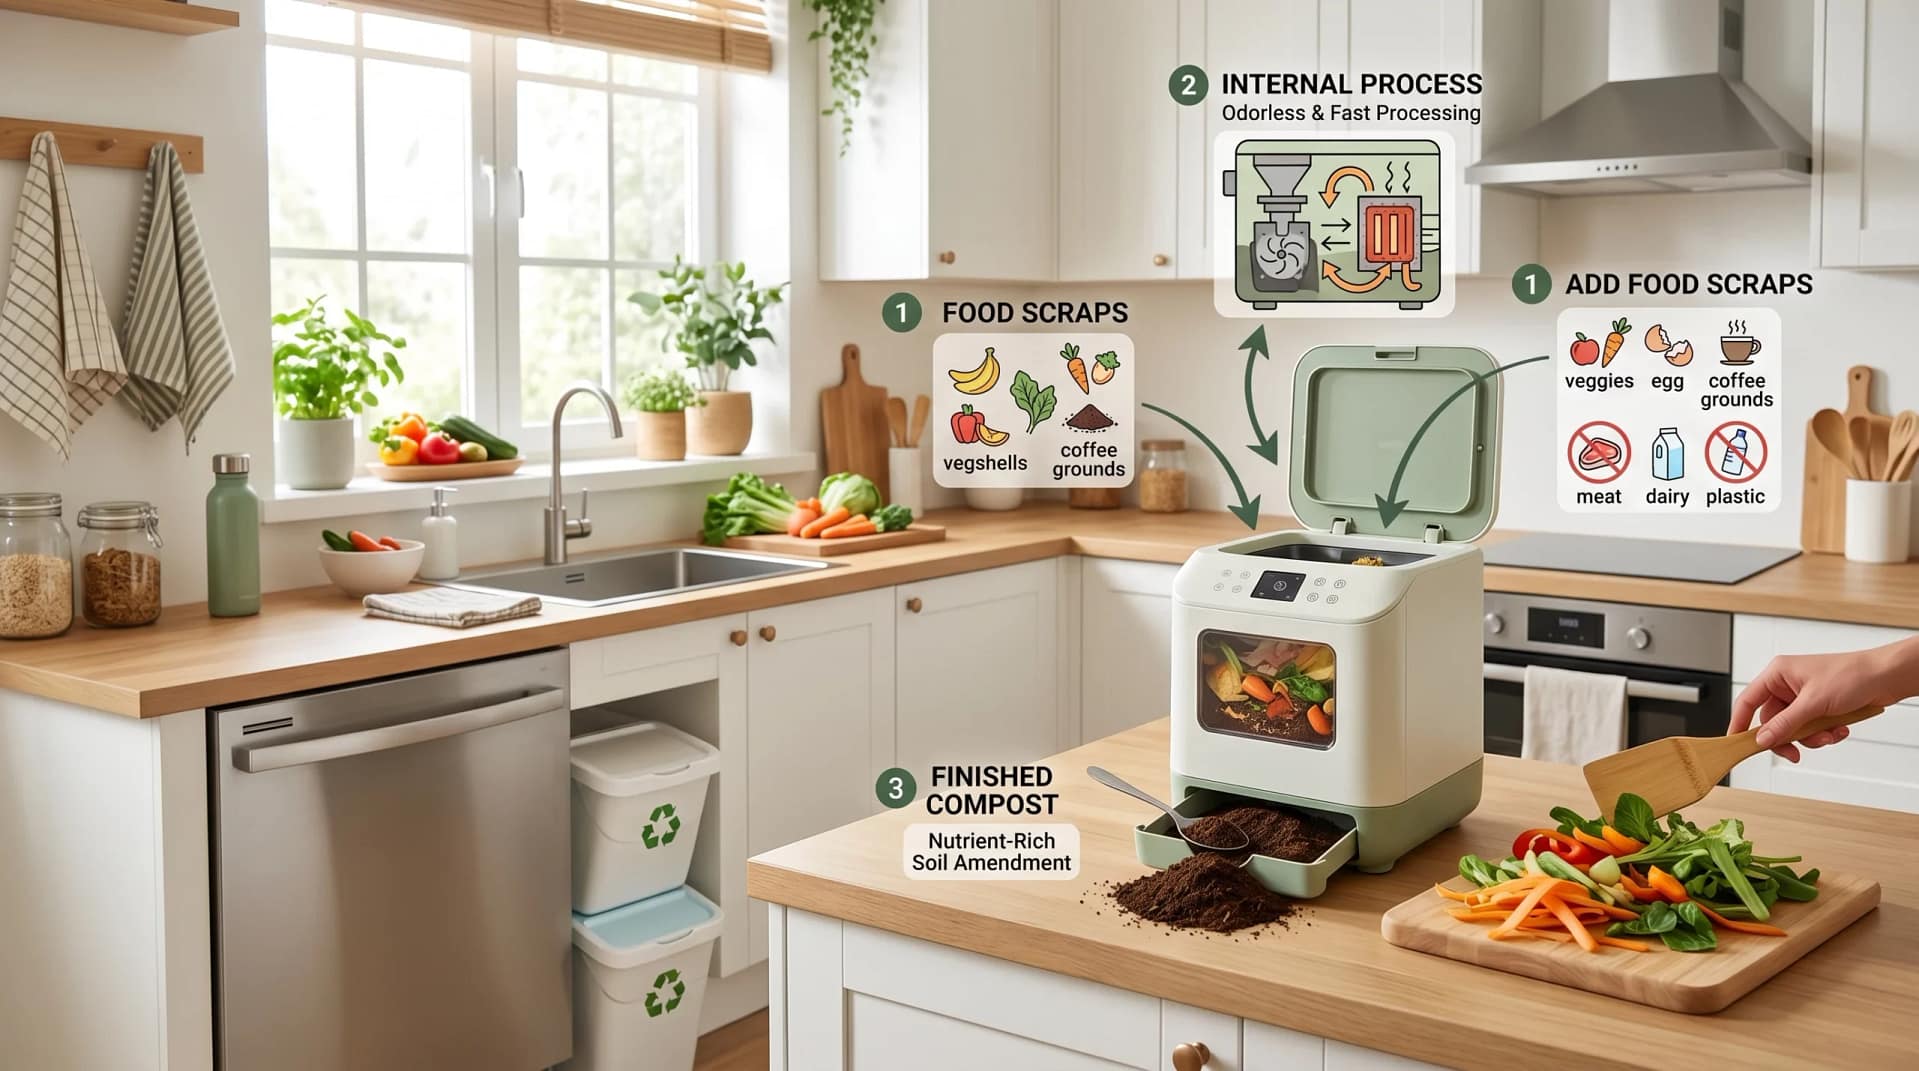
Step 2: Collect Food Scraps
Start saving kitchen scraps throughout the day.
- Fruit scraps
- Vegetable peelings
- Coffee grounds
- Tea Bags (plastic-free)
- Crushed eggshells
- Rice and grains
- Bread
- Pasta
- Large bones
- Cooking oil and grease
- Plastic
- Metal
- Glass
- Excess liquids
Always check the manufacturer’s recommendations because acceptable materials vary between composting systems.
Step 3: Add Scraps Regularly
Small amounts added consistently work better than overloading the system.
Aim to:
- Chop larger scraps into smaller pieces
- Spread materials evenly
- Avoid compacting food waste
- Keep the lid closed when not in use
Smaller pieces break down faster and help reduce odors.
Step 4: Follow Your Composter’s Instructions
Different systems operate differently.
- Add food scraps.
- Close the lid.
- Start the cycle.
- Wait for drying and grinding to finish.
- Remove the finished material.
- Add food scraps.
- Sprinkle Bokashi bran.
- Compress the waste.
- Seal the lid tightly.
- Allow fermentation.
- Collect scraps daily.
- Empty regularly into a larger compost system or outdoor compost pile.
Step 5: Maintain Proper Moisture
Healthy compost should resemble a wrung-out sponge.
If the mixture becomes too wet:
- Add dry material if appropriate.
- Reduce liquids.
- Empty the unit if needed.
If it becomes too dry:
- Add fresh scraps.
- Follow the manufacturer’s recommendations.
Balanced moisture encourages efficient decomposition.
Step 6: Clean the Composter Regularly
Routine maintenance helps prevent smells and pests.
Weekly maintenance:
- Wipe the lid.
- Empty collection trays.
- Clean filters if applicable.
- Wash removable parts with warm soapy water.
Monthly maintenance:
- Inspect seals and gaskets.
- Replace carbon filters if required.
- Check moving components on electric models.
A clean composter performs better and lasts longer.
Step 7: Use the Finished Compost
Depending on the system, the final product may be:
- Compost
- Soil amendment
- Pre-compost material
- Nutrient-rich fertilizer base
You can use it:
- Around vegetables
- In flower gardens
- For indoor plants
- In raised beds
- Mixed into potting soil
Electric composters typically create dehydrated material that may benefit from additional curing before use.
Common Problems and Solutions
Bad Smells
Possible causes:
- Too much moisture
- Overfilling
- Lack of cleaning
Solutions:
- Empty the container.
- Clean filters.
- Reduce wet foods.
- Follow manufacturer guidelines.
Mold Appears
Small amounts of mold (mould) are usually normal.
Reduce excess moisture and maintain airflow if recommended for your system.
Slow Composting
Causes:
- Large food pieces
- Incorrect moisture
- Overloading
Solutions:
- Chop scraps smaller.
- Add materials gradually.
- Perform regular maintenance.
Common Questions About Using a Compact Kitchen Composter
How do you use a compact kitchen composter?
Using a compact kitchen composter is simple:
- Place the composter in a convenient location.
- Collect food scraps such as fruit peels and coffee grounds.
- Add scraps regularly in small amounts.
- Follow the manufacturer’s instructions.
- Maintain proper moisture levels.
- Clean the unit regularly.
- Use the finished compost in your garden or houseplants.
Most modern kitchen composters are designed to be easy to use and odor-free.
What can you put in a compact kitchen composter?
Most compact kitchen composters accept:
- Fruit scraps
- Vegetable peelings
- Coffee grounds
- Tea leaves
- Rice and grains
- Bread
- Pasta
- Crushed eggshells
Always consult your manufacturer’s guidelines because accepted materials vary by composting system.
Do compact kitchen composters smell?
No, when used correctly, compact kitchen composters produce little or no odor. Regular cleaning, avoiding excess moisture and following the manufacturer’s instructions help prevent unpleasant smells.
How long does a kitchen composter take?
Composting time depends on the system:
- Electric composters: 2 to 24 hours
- Bokashi systems: 2 to 4 weeks
- Traditional indoor composting: Several weeks to months
Processing times vary depending on the type of food waste and the composting method.
Is compost from electric composters ready to use immediately?
Not always. Electric composters create dehydrated organic material rather than fully matured compost. For best results, many gardeners recommend curing the material further or mixing it with traditional compost before applying it to plants.
Benefits of Using a Compact Kitchen Composter
Using a kitchen composter can:
- Reduce household waste
- Minimize methane emissions from landfills
- Create useful compost
- Reduce trash odors
- Support sustainable living
- Save money on fertilizers
Even small daily habits can make a significant environmental difference.
Frequently Asked Questions
Can I use a kitchen composter in an apartment?
Yes. Most compact kitchen composters are specifically designed for apartments and small spaces.
Do compact kitchen composters smell?
When maintained properly, modern composters produce little to no odor.
Can I put meat in a kitchen composter?
Some electric composters can process meat scraps, while traditional systems may not. Always follow the manufacturer’s recommendations.
How long does composting take?
Electric composters may finish a cycle in hours, while natural systems and Bokashi methods can take several weeks.
Can I compost coffee grounds?
Yes. Coffee grounds are commonly accepted and provide valuable nutrients.
Is the material from electric composters ready to use immediately?
Not always. Many experts recommend allowing the dried material to cure further or mixing it with traditional compost before applying it to plants.
Final Thoughts
Learning how to use a compact kitchen composter is one of the easiest ways to reduce food waste and live more sustainably. With regular maintenance and the right materials, even beginners can transform everyday scraps into valuable nutrients for their plants and gardens.
Whether you choose an electric kitchen composter, a Bokashi bucket, or a simple countertop system, the process is straightforward and rewarding.
Start small, stay consistent and let your kitchen scraps become something useful instead of ending up in landfill.